
GUI Design
Graphical specifications are now a first-class part of the Appx development environment. Your application can include pictures, buttons, wallpapers, boxes and lines, multiple fonts, multiple colors, and menus. You can also define the preferred representation for each on-screen item - for example, you might want to represent a numeric field as a progress bar.
Appx applications can now include pictures in a number of locations. The Appx client understands GIF, animated GIF, JPEG, or BMP picture formats. You can specify an icon for each frame or image. You can paint a picture anywhere within an image (using the drag-and-drop image editor). You can paint a picture onto any button. In fact, you can assign multiple pictures for each button - a picture to be displayed when the button is enabled, a picture to be displayed when the button is disabled, a selected picture, and a rollover picture. You can control the border style for pictures (and of course your buttons). Choose from no border, a simple line, or multiple 3D border styles (raised, etched, beveled, etc.).
In addition to buttons and pictures, you can specify an icon for each frame and image (this icon appears in the upper-left-hand corner of the frame). You can even define a wallpaper (background picture) for each frame and image. Or, just specify a background color.
And buttons can contain text as well. You can control the placement of the text within the button, the color of the text, and the font.
You can now mix fonts within an application. You can assign a font to each item, each label (what used to be called "background text"), each button, and to the titlebars of each frame and image. In addition to selecting the name of the font, you can control the style (italic, bold, or normal), the size of the font (relative to a baseline), and the color (both foreground and background).
We have changed the Appx color model from a 16-choice model into a true RGB model - anywhere you can specify a color (for example, the background color for an image), you can choose the red, green, and blue components. And, of course, if you are using a graphically enabled client, you can just point at the color you want within a color wheel.
You can draw boxes and lines to help group items together - again, you can control the border style, the colors, and the font (including style and size) used to title the box. You can also control the placement of the (optional) title within the box.
Release 4.1 also allows you to assign graphical specifications to your data. You can assign a preferred representation to each item. For numeric fields, you can specify raw text, slider, or a progress bar. For alpha fields, you can specify raw text, password, file chooser, color chooser, or picture. Date items can be represented by raw text, or by a clock/calendar control. And logic fields can be displayed as raw text, checkboxes, or toggle buttons (with or without pictures).
Of course you can specify the colors, fonts, and font styles for each item as well.
Painting an alpha field as a picture lets you store a picture in your data files. You can store the picture bits themselves, or you can store a file name or URL. See Resources below for more information.
Appx can add some design elements automatically. For example, Appx will build toolbars, pulldown menus, and popup (right-click) menus from the optional children defined in each process. By default, all optional children will appear on the Process menu. If you wish, you can also place optional children on a toolbar and in the popup menu. You can specify the name of the menu, the name of the toolbar, the color of the entry in the menu, the font (and style) of the menu entry, and the mnemonic (shortcut). You can also define toolbar icons (for enabled, disabled, rollover, etc.). You can define the placement of the label within the toolbar (and of course the color, font, and font style).
Appx also adds scan indicators for all scannable items. For tokenized fields, lookup tables, and suggestion tables (see below), Appx displays a drop-down listbox.
You have complete control over all graphical elements through ILF code. Prior to executing the Pre-Display event point, Appx fills the --- WIDGET memory file with all of the graphical specifications that the user is about to see. You can adjust the records in the WIDGET file using READ and REWRITE statements, or using some new convenience statements (ENABLE and DISABLE for example). We will be adding more convenience statements in the future.
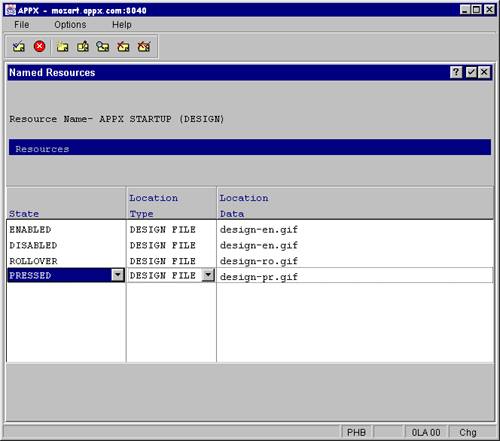
Your application can use Named Resources to group pictures together. A Resource is a named collection of pictures - each picture within a resource has a state: enabled, disabled, rollover, wallpaper, etc.. You can store each picture in a different location - Appx supports the following location types:
Client File
The resource is stored on the client, in a file whose name you specify.
Client URL
The resource is found by the client, using a URL which you specify (such as http://www.appx.com/appx.gif
Server File
The resource is stored within a file on the host (and cached on the client).
Server URL
The resource is found by the server, using a URL which you specify.
Design
The resource is stored in your application's Resource directory, in a file whose name you specify.
Using a client-side resource gives the best performance, but the resource must be accessible from the client machine. Using a server-side resource makes it easier to distribute your application, but each resource must be sent to each client as needed (the resources are cached on the client though). You can use either a Server URL or a Client URL depending on which machine is behind a firewall. Using a location type of Design means that the resource becomes part of your application (as opposed to being part of your data).
Example - Wallpaper
APPX allows you to design GUI menus using various types of GUI widgets and features. You can design a menu to have the following types of GUI characteristics:
- A custom titlebar for the menu frame
- A specified border style around the menu frame
- A wallpaper graphic or background color within the menu frame
- Buttons on the menu image
- Boxes and Lines on the menu image
- Labels (text) on the menu image
- Pictures on the menu image
- Pulldown menus
- Toolbar buttons
- Popup menu (right click at runtime)
Wallpaper can be specified by specifying a background color for the menu image or by specifying a background graphic for the menu image. Wallpaper is specified by selecting GUI Attributes at the process level of an APPX menu - you provide a resource name and a tiling mode:
Resource
The resource name is used to identify the resource for the wallpaper graphic which you would like to appear on the menu image. The "WALLPAPER" State of the named resource identifies the wallpaper graphic file. Allowable file types are jpg, bmp, and gif.
Tiling Mode
A tiling mode may be specified to deal with a wallpaper graphic file which is not the same size as the menu image. You may choose from the following list:
- TILE - Tile the wallpaper graphic to fill the menu image
- EXPAND - Expand or shrink the wallpaper graphic to fit the menu image
- CENTER - Center the wallpaper graphic within the menu image
The remaining options position the wallpaper graphic at the specified compass points on the menu image.
- NORTH
- EAST
- SOUTH
- WEST
- NORTHEAST
- NORTHWEST
- SOUTHEAST
- SOUTHWEST
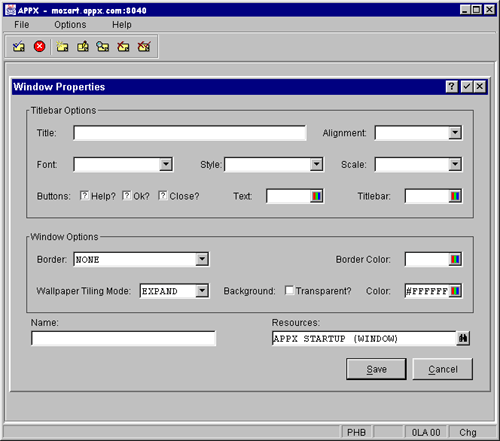
Example - Menu Titlebar
Before you design a custom Title Bar, you should first remove the title text and the inverse attributes which you or APPX may have previously set on the first row of the image. This can be done by positioning the cursor on row 1 and using Option 6 to delete the row. Option 7 can then be used to insert a blank row if necessary to shift everything back down. Removing row 1 will prevent the Auto-GUI feature of APPX from generating a title bar for you.
A title bar is designed by selecting GUI Attributes at the process level of an APPX menu.
On the GUI Attributes screen, you provide the titlebar text and a resource name, and you can control the set of buttons to appear in the titlebar.
Titlebar Text
The titlebar text will appear on the title bar.
Resource
The resource name is used to identify the resource for the icon which you would like to appear on the titlebar. The ENABLED state of the named resource identifies the icon file.
Show Buttons
The show buttons is used to identify which default buttons you would like to appear on the titlebar. Default buttons you can define are:
- Check "Ok" if you want an OK button to appear on the right hand side of the titlebar.
- Check "Close" if you want a close button to appear on the right hand side of the titlebar.
On the Additional GUI Attributes screen you provide a font name, the font style and scale, and colors for the titlebar.
Font Name
You may select from any of the fonts listed. User defined fonts are not currently supported.
Font Style
You may select from any of the font styles listed:
- Bold
- Bold Italic
- Italic
- Regular
Font Scale
Font scale may be specified as a percentage of the base font size.
Color - foreground and background:
Colors may be specified for the titlebar foreground (text) and the titlebar background.
RDBMS Interfaces
Release 4.1 gives you significant increases in performance and flexibility when storing data in an RDBMS.
After extensive exploration, we have identified the major performance problems in prior releases of Appx. The three largest factors in determining Appx/RDBMS performance are COMMIT frequency, table width, and statement caching.
Statement Caching
When your application requests an I/O operation (READ, WRITE, or REWRITE for example), Appx translates each request into an SQL statement and sends that statement to the RDBMS server. Starting with release 4.1, Appx uses parameterized SQL statements to minimize the amount of network traffic and SQL parsing required. This means, for example, that the first time you WRITE a record to an RDBMS, Appx creates a statement of the form "INSERT table VALUES ( :1, :2, :3)", then sends that statement to the server. If your application executes another WRITE statement to the same table, we reuse the cached INSERT statement, providing new values.
When we reuse a cached statement, the database won't have to parse the statement, query it's own data dictionary, or compute a new query plan. Also, we don't have to send the text of the statement across the client/server connection.
Commit Frequency
Prior to release 4.1, Appx committed each change as soon as the change was made. This is extremely expensive. With release 4.1, you have control over commit frequency. We have added a new PDF (pre-defined-field) called --- COMMIT MODE which controls how often Appx will commit your changes. The values for --- COMMIT MODE are:
- COMPATIBLE
- When --- COMMIT MODE is set to COMPATIBLE, Appx will commit your changes as soon as all locks have been freed. This mode provides maximum compatibility between AppxIO files and RDBMS tables. The default value for --- COMMIT MODE is COMPATIBLE.
- PCF CYCLE
- When --- COMMIT MODE is set to PCF CYCLE, Appx will commit your changes for each record processed from the PCF. In most cases, the commit will occur following the Post PCF Update event point.
- END
- When --- COMMIT MODE is set to END, Appx will commit changes when your process ends.
- MANUAL
- Setting --- COMMIT MODE to MANUAL will tell Appx that it should not automatically commit changes - instead, you must commit your changes using the COMMIT statement.
In addition to the --- COMMIT MODE pre-defined field, you can also specify a commit mode for each process (in Additional Attributes). The --- COMMIT MODE pdf will be set based on the commit mode for your process.
If you change the --- COMMIT MODE pdf, the change will take affect at the next COMMIT or ROLLBACK.
There are three new ILF statements which allow you more control over transaction processing:
- COMMIT
- This statement will cause an immediate commit of all changes made to the tables stored within an RDBMS. All record locks will be forfeited.
- ROLLBACK
- Executing a ROLLBACK will cause the RDBMS to discard all changes made during the current transaction. Again, all record locks are forfeited.
- SAVEPNT
- This statement allows you to establish a savepoint within a transaction. The ROLLBACK statement can refer to a save point. If you include a savepoint name in a ROLLBACK statement, changes made since that savepoint are discarded, but changes made prior to the savepoint are not discarded.
Partial-record I/O
In order to correct the performance problems associated with very wide tables, we have modified the READ, READNEXT, BEG READ, END READ, WRITE, and REWRITE statements. Prior to release 4.1, you specified a file name as the first operand to these statements. Now, you can specify either a file name or a field name. If you specify a file name, Appx will operate on the entire record. If you specify a field name, the above I/O statement will operate on the named field - if the field is a group header, the I/O will be performed on all members of the group.
We have also added support for partial-record I/O to the process-control-file for each process. You can tell Appx which PCF fields to deal with by setting the Partial-Record I/O field in Additional Attributes for each process.
You can use this new capability to limit the amount of data transferred between Appx and an RDBMS. For example, if you know that a particular section of ILF code needs to update only one or two fields within a record, you can change the I/O statements to refer only to those fields.
Before:
BEG READ TPA EMPLOYEE  HOLD 1   KEY EMPLOYEE KEY
COMPUTE  TPA EMPLOYEE SALARY        *    1.1
REWRITE  TPA EMPLOYEE
END READ TPA EMPOYEE
After:
BEG READ TPA EMPLOYEE KEY + SALARY  HOLD 1   BY EMPLOYEE KEY
COMPUTE  TPA EMPLOYEE SALARY        *    1.1
REWRITE  TPA EMPLOYEE SALARY
END READ TPA EMPLOYEE KEY + SALARY
Using the partial-record form of the I/O statements can greatly improve performance when storing data in an RDBMS.
When you WRITE a single field (or a group field), Appx will write NULL values into the remainder of the record. When you READ (or READNEXT, or BEG READ) a partial record, the remainder of the record will contain NULL values. If you REWRITE a partial record, the remainder of the record will not be modified.
The READNEXT statement allows you to enter a field name (rather than a file name), however, that field name is not really used to restrict the set of fields retrieved from the RDBMS server. Consider that Appx is generating SQL statements on the fly - when you execute a BEG/END READ statement, Appx generates a "select from table where and ". Executing that select statement causes the RDBMS to generate a recordset - the recordset contains all of selected columns for each of the selected records. The READNEXT statement (and in fact the END READ statement) cannot change the recordset - it can only fetch the next row from that recordset. So, the fieldname supplied to a READNEXT statement (or an END READ) statement is for documentation purposes only: you cannot use a READNEXT statement to change which columns are present in the recordset.
Even thought the END READ statement now allows specification of a field name, this is for documentation and consistency purposes only and is not actually used other than to indirectly identify the file name so that the END READ can be associated with the appropriate corresponding BEG READ statement.
REWRITE statements also allow specification of a file name or a field name. If you specify a field name, only the name field or group of fields will be updated. All other values in the record being updated will be unchanged. The field name specified on a REWRITE statement does not need to be the same as the field name specified on the READ statement which read the record. So, you could read the entire record with hold by specifying a file name on the read statement and then update a single field by specifying that field name on the REWRITE statement. Or, you could read a group of fields and then rewrite a different group of fields (presumably a smaller group of fields within the group originally read but not necessarily).
Partial-Record I/O will read only the field or group of fields specified. The key field specified on the READ statement will not be read unless the key field is included in the group of fields specified on the READ statement. If you need the key field to be read, remember that a SYNONYM for the key field can easily be included in any group that you may define in the Data Dictionary. The primary purpose of implementing Partial-Record I/O is to increase performance by only reading and writing the fields which are actually needed. If APPX always included the key field values on a READ, then we would be slowing down performance in those cases where the key fields are not specifically needed by the process.
Note: In release 4.1, AppxIO files will not support partial record I/O. The partial record I/O statements will still function, but they will function on the entire record. Also, a partial record READ-type statement will not set the remainder of the record to NULL values.
Column Level Overrides
Starting with this release, you have more control over the way Appx stores data in an RDBMS - you can override the choices normally made by Appx to affect the data types, column names, and "nullability" for each column in each table. When you create a table in, for example, and Oracle database, you can view (and edit) column-level overrides from within Database Management: choose "File Specifications", then "Field Overrides". Here, you will see a list of all of the fields (columns) in your file and you can the column name, data type, and "nullability" for each field.
Specification-based File Attributes
While you are in Database Management/File Specifications, you may also notice that we changed "FMS Control String" to "File Attributes". Each file management system (Oracle, Sybase, AppxIO, etc.) understands a different set of file attributes. In earlier release, you had to enter a complex specification to control how Appx interfaced with the back-end database. Now, we prompt you for the required information using a fill in the blanks format. For example, if you choose to store a file in an Oracle database, we will ask you for the server name, a table naming scheme, and other information which is used to properly size tables with Oracle.
Identities
When Appx needs to connect to another server (either an RDBMS or AppxNET server), it must provide a username and password to that server. We have introduced a new system administration facility called Identities, which allow you to specify a username/password pair for each user, each file system group, or each user/file system group pair.
Identities give you more flexibility in controlling login information. There are two types of identities - default identities and unique identities. A unique identity is tied to a three-character Appx User ID. When you connect to an RDBMS (or AppxNET server), Appx tries to find an unique identity for your user id - if it finds one, it provides the username and password to Oracle. If Appx can't find a unique identity for your user id, it looks for a default identity, and if it finds one, it provides the username and password to the RDBMS. If Appx can't find a default identity, you can't login to the server.
For example, you might have elevated privileges when logging into Oracle, so the identity record for your Appx User ID specifies that you should connect to Oracle using your own username and password. You might give unique identities to two or three other privileged users. Then, you can also define a default identity - that identity is used for all other users and would specify a username of defaultappxuser. This default identity means that all other users will identify themselves to Oracle using the same username.
You can view the identities defined for each user by going to System Administration, Security, then Users - choose Identities.
You can view the identities defined for a specific file system group by going to System Administration, Configuration, File System Groups - again, choose Identities.
These are two different views of the same list.
In order to use identities, you must create a File System Group and assign each file to that group.
Oracle Table sizing options
Using specification-based file options, you can control the storage clause used when Appx creates a table in an Oracle database. You can specify the following options:
- tablespace
- initial
- next
- pctincrease
- minextents
- maxextents
- pctfree
- pctused
- freelists
- freelist groups
- initrans
- maxtrans
These options correspond to the storage clause of the Oracle create table statement. Estimating initial table sizes properly can give you a large performance boost.
File Caching
With release 4.1, you can now specify that you want some of your files to be cached in memory, rather than retrieving the records from disk (or from and RDBMS server) each time they are required. This can give you a big performance boost - especially when you run a process which accesses the same data over and over again (looking up data in code tables during a long-running update process, for example).
Currently, you must use ILF statement to control caching - in a future release, we will add cache-related specifications in the data dictionary and at the process level so that you don't have to write as much ILF code.
CREATE Statement
The CREATE statement can now be used to programmatically create and open a cached instance of a file. Specifying a CACHE option other than 'NONE' causes a cached instance of a file to be created in memory and opened instead of the normal disk instance of the file. The value of the CACHE option determines how the cached instance of the file is populated. If --- NEXT DATABASE is specified for a CREATE statement which is to create a cached file, then the value of next database determines the source database for loading the cache. Otherwise the current database is used to determine the source of the file which is used to load the cache.
CREATE ___ ________ SHARE? _ FAIL _ CACHE _______
       (1)   (2)          (3)    (4)        (5)
- Application ID
- File Name
- Share Y/N?
- Fail Type
- Cache type
CACHE TYPE:
- NONE
- Create and open the file as a normal, non-cached file.
- NO LOAD
- Create and open the cached instance of the file but do not load any records into the cache file (use the WRITE statement to populate the cache).
- LOAD
- Create and open the cached instance of the file and load cache file from the disk instance of file.
- AUTO
- (Currently same as LOAD) Create and open the cached instance of the file. Dynamically populate the cache from the disk instance of the file as records are individually read.
OPEN Statement
A new parameter has been added to the OPEN statement which allows you to open either the cached instance of a file or the disk instance of the file. If CACHE=Y and the cached instance of the file does not exist, then the OPEN statement will fail. So, a CREATE statement must be used to create the cached instance of a file before the OPEN statement can be used to open it. If --- NEXT DATABASE is specified in conjunction with CACHE=Y, then --- NEXT DATABASE is cleared and ignored.
OPEN ___ ________ SHARE? _ FAIL _ CACHE? _
     (1)   (2)          (3)    (4)      (5)
- Application ID
- File Name
- Share Y/N?
- Fail Type
- Cache Y/N?
SCRATCH Statement
A new parameter has been added to the SCRATCH statement which allows you to scratch either the cached instance of a file or the disk instance of the file. If --- NEXT DATABASE is specified in conjunction with CACHE=Y, then --- NEXT DATABASE is cleared and ignored.
SCRATCH ___ ________ FAIL _ CACHE? _
        (1)   (2)        (3)      (4)
- Application ID
- File Name
- Fail Type
- Cache Y/N?
CLOSE Statement
The CLOSE statement closes the currently opened instance of a file, either disk or cache.
Like memory files, there can be only a single instance of a cached file. There is not a separate instance of a cached file for each database.
Once you have opened the cached instance of a file, all I/O which follows will reference the cached instance of the file, not the disk instance.
If you execute a CREATE statement with CACHE=NO LOAD, then you can load the file yourself, perhaps with a subset of the records. One possible use of this would be to effectively constrain a DLU.
If you rewrite, delete, or write records to the cached instance of the file, the disk instance of the file will not be updated. If the disk instance of the file changes after you create and load the cached instance of the file, the cached instance of the file will not automatically include these changes.
Cached files were conceived as a performance enhancement for "read only" files which are stored as tables in databases. However, they should prove to be useful in many other applications as well!
Here is some example code which shows how to manually populate a cache with selected records:
        *
        * This code creates a cached instance of the SALESREP file and
        * loads it with the "Inside" salesreps
        *
        * Create a cache instance of the SALESREP file
        *
        CREATE   CCA SALESREP SHARE? Y FAIL 0 CACHE NOLOAD
        *
        * Open the disk instance of the file
        *
        OPEN     CCA SALESREP SHARE? Y FAIL 0 CACHE? N
        *
        * Read all of the SALESREP records
        *
        BEG READ CCA SALESREP HOLD 0 KEY IS SALESREP SALESPERSON
        *
        * Add only the inside salesreps to the cache
        *
        IF       CCA SALESREP INSIDE EQ Y
T       OPEN     CCA SALESREP SHARE? Y FAIL 0 CACHE? Y
T       WRITE    CCA SALESREP FAIL 0
T       OPEN     CCA SALESREP SHARE? Y FAIL 0 CACHE? N
        *
        END READ CCA SALESREP
        *
        * open the cached instance - all references within
        * the process will now use the cached instance
        *
        OPEN     CCA SALESREP SHARE? Y FAIL 0 CACHE? Y
File Level Event Points
You can now attach ILF code to files. There are five new event points available to you when you define a file in the Appx data dictionary.
- File Open
- File Close
- Post Read
- Pre Update
- Post Update
These event points are executed each time you perform I/O to a file - no matter where the I/O occurs. You can now localize complex update rules into a single location and be assured that your code will execute for every update. You can also use these event points to give values to computed fields.
File level event points execute within the context of a file-level process. This process shares very little data with other processes. In fact, the only thing shared between a file-level process and the "foreground" process is the PCF record buffer. For example, in the Post Read event point, you have access to the contents of the record just retrieved. If you make changes to the record buffer, those changes will be reflected in the foreground process. In the Pre Update event point, you have access to the PCF record buffer as delivered by the foreground process.
The file level event points will execute in conjunction with APPX/ODBC file I/O. For example, if you read a record via APPX/ODBC, the Post Read event point for the file will execute. If you write a record via APPX/ODBC, then the Pre Update event point will execute just before the record is written and the Post Update event point will execute just after the record is written.
An APPX process that is performing I/O against stored in an external database such as SQL Server® will cause the file level event points to execute. This is in keeping with the premise that an APPX application should be able to produce the same result regardless of the FMS used to store the data.
However, if an outside process accesses a file which APPX has stored in an external file management system such as SQL Server, the file level event points will not execute. There is no way for APPX to know that an external I/O has occurred.
Quick Restructures
The Appx restructure facility has been improved in order to reduce the amount of time required to restructure large files. Before performing a restructure, we now analyze the changes made to the file and ask the file storage system (AppxIO, an RDBMS, etc.) whether it knows how to apply those changes. If so, we ask the storage system to perform the restructure. If not, Appx falls back to it's old method of copying each record from the original file to a new file (converting from old to new format along the way), then renaming the new file.
The AppxIO storage system supports quick restructures and can handle the following types of changes without having to process each record:
- Adding a new field (or fields) to the end of the record
- Increasing the length of the last field in the record (if the last field is an alpha)
- Changing a file from fixed-length to variable-length records
(Note that you must change your file to allow variable-length records before AppxIO can use the quick restructure strategy for the above changes - you can do this in the Additional Attributes dialog for your file).
In the future, AppxIO will also allow you to add and delete indexes (keys) without reverting to the copy/rename strategy.
The Oracle storage interface also supports quick restructures and can handle the following changes without having to process each record:
- Adding a new field (or fields) to the end of the record
- Adding a new key
- Deleting an old key
- Changing the structure of an existing key
- Changing a file from fixed-length to variable-length records
(Note that you must change your file to allow variable-length records before Oracle can use the quick restructure strategy for the above changes - you can do this in the Additional Attributes dialog for your file).
Fast Queries
Release 4.1 introduces significant improvements in the Appx query processor.
In past releases, Appx used a "read all records" strategy for most queries. (You could force Appx to read a restricted range of PCF records in some cases using child constraints, but that technique cannot be used in many situations).
The new query processor will utilize existing indexes (keys) when evaluating a query. After processing the selection expression, Appx will determine which constraints can be used to establish an indexed range read. Once all of the candidates have been identified, we assign a weight to each constraint according to it's usefulness and then select the candidate with the greatest weight. Various factors are used when applying weights including:
- How much of the key is constrained
- Whether or not the key allows duplicate values
- The BEG AT and END AT flags specified by the designer
- Whether or not the key can be used to order the result set
After selecting an index, Appx produces an event point which will process the PCF records in a manner which is (usually) more optimal than the "read all records" strategy. This new event point is called the Establish Range event point and can be overridden by the application designer. If you override the Establish Range event point, Appx will not generate one at runtime.
We have also made changes to the sorting strategy used in the query processor. Appx tries to perform all sort operations in memory, but, when the number of records in the result set reaches a certain threshold, some of the sort operations are moved to disk. In 4.1, we have increased the threshold - this may still cause disk I/O, but that I/O will move through the operating systems virtual memory manager, rather than the file manager, resulting in higher performance.
Also, Appx will now skip the sort phase of a query if the records returned by the Establish Range event point are already in the desired order.
If you decide to write your own Establish Range event point (rather than having Appx generate one for you), there are a few details you will need. First, you probably want your event point to be in the form of one or more BEG READ/END READ loops. Then, within each loop, you must GOSUB the --- PROCESS QUERY RECORD process. Below is a sample Establish Range event point:
      *        Process first range of records
      SET      TAP VENDOR NO                  =      10
      BEG AT   TAP VENDOR   IN TAP VENDOR NO
      END AT   TAP VENDOR   IN TAP VENDOR NO
      BEG READ TAP VENDOR                 HOLD 0 KEY IS  VENDOR NO
      GOSUB    --- PROCESS QUERY RECORD
      END READ TAP VENDOR
      *        Process next range of records
      SET      TAP VENDOR NO                  =      200
      BEG AT   TAP VENDOR   IN TAP VENDOR NO
      SET      TAP VENDOR NO                  =      500
      END AT   TAP VENDOR   IN TAP VENDOR NO
      BEG READ TAP VENDOR                 HOLD 0 KEY IS  VENDOR NO
      GOSUB    --- PROCESS QUERY RECORD
      END READ TAP VENDOR
(you can find this example in the 1EX/00 QUERY (ESTABLISH PCF RANGE) subroutine process).
Data Dictionary Importer
The APPX data dictionary importer is used to import data definitions from an external source and build an APPX data dictionary of files and fields.
Once the data dictionary for an application is built, a "template application" can be generated.
The template application consists of toolbox-generated inputs, outputs, and updates (for comma delimited exports) placed onto a basic menu structure.General Features
- Table and column names can quickly be defaulted to APPX standards for file and field names.
- Indexes are recognized and generated as APPX key fields.
- Multi-column indexes generated as synonym fields with surrounding group header/trailer.
- Single column foreign key constraints are generated as field level DLU's (Oracle only).
Limitations
Oracle
Table definitions are importable, but views are currently not importable.
Data Dictionary Builder
Currently, we do not check for, or scratch existing files or fields in the application. This is currently the responsibility of the designer. The best way to avoid conflicts (and loss of data) is to generate the data dictionary into an empty application.
Application Generator
We does not check for or scratch existing processes in the application. This is currently the responsibility of the designer. Again, avoid collisions by generating processes into an empty application.
RECEIVE statement
The RECEIVE statement works with the PASS statement to implement true subroutines. Here is an example of the PASS and RECEIVE statements in action:
PASS    TAR CUSTOMER NAME         FIELD    SHARED? N
PASS    TAR WORK STRING LENGTH    FIELD    SHARED? Y
GOSUB   :COMPUTE STRING LENGTH

*
* WORK STRING LENGTH now contains the length of TAR CUSTOMER NAME
*

...

LABEL   :COMPUTE STRING LENGTH
*
RECEIVE --- TEMP 2K
RECEIVE --- AI
*
CNV BIN --- TEMP 1            =       0
APPEND  --- TEMP 2K           0   --- TEMP 1
IF      --- TEMP 2K           IN  --- TEMP 1
SET     --- AI                =   --- TEXT AT POSITION
COMPUTE --- AI                -       1
RETURN
After executing the first RECEIVE statement, the --- TEMP 2K field will contain the value of the TAR CUSTOMER field. After executing the second RECEIVE statement, --- AI will contain the value of TAR WORK STRING LENGTH (although that's not terribly important right now). We compute the string length by appending a null character to --- TEMP 2K, then using IF/IN to find the position of that character (which is returned in --- TEXT AT POSITION).
More magic occurs when we execute the RETURN statement. First, since TAR CUSTOMER NAME was not shared, we restore the value of TAR CUSTOMER NAME string (just in case our subroutine messed it up), then we restore the value of the --- TEMP 2K field (we took a snapshot of both fields when we executed the RECEIVE statement). Next, we copy the value of --- AI into TAR WORK STRING LENGTH, providing the return value for this subroutine, and restore the value of --- AI.
The net result is that the variables that we RECEIVED inside the subroutine are restored to their original values (so you can use any variables that you want without having to worry about changing the caller's data), and the caller now has the data that he wants - in this case, the length of the string passed as the first parameter.
Note that the data types of the PASS and RECEIVE fields don't have to match. We use the same rules as the SET statement to convert from the PASS field into the RECEIVE field (and to convert back again for "out" parameters).
The RECEIVE statement can be used in two locations:
- inside a LABEL'ed subroutine - values are restored when the RETURN is executed
- inside Start Of Process - values are restored when the process ends
Also note that the RECEIVE statement returns a T/F flag. It returns a T if a matching PASS statement was found, and a F if not. If you RECEIVE without a PASS statement, you are essentially declaring a local variable - that field will contain it's initial value and it will be restored when the subroutine (or event point or process) ends.
Miscellaneous Fixes and Enhancements
We have increased the maximum file size for AppxIO files from 1GB to 2GB under Windows®, and from 2GB to 4GB for AIX and Solaris - no changes or restructures are required to enable this enhancement.
You can now specify that an alpha lookup table should be used as a suggestion table. Using a suggestion table allows the user to scan for a list of suggestions, but he can still enter a value which does not appear in the list.
We have added a Recalculate Hash ID's facility to the Language Translation menu. You can used this feature whenever you make changes to the definition of a language - it is not necessary to recalculate hash ID's when changing a translation, only when changing the base characteristics of a language (such as upper/lower case map).
The Win32 client will now Cut and Paste accented characters
The SET statement has been fixed so that it is safe to assign to (or from) a group which contains synonyms.