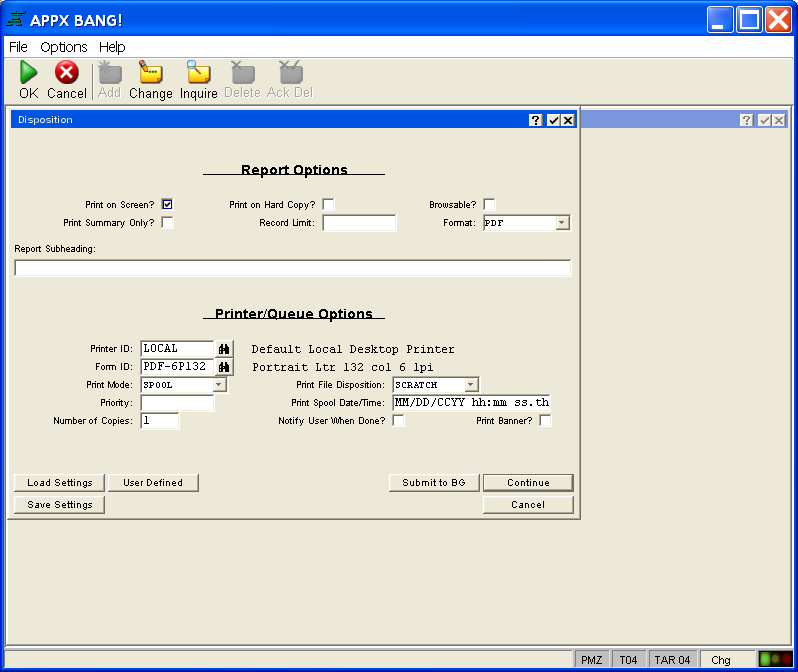
Many outputs provide you with another screen that you can use to control certain print-related options. This screen is referred to as a “disposition” input process and, although the form of the screen may vary depending on your application, it usually allows you to control the same types of information. Certain fields on the Disposition screen may not have any effect on some computer systems. Check with your System Administrator to determine which Disposition features are supported by your computer system. Figure 19 contains a typical Disposition screen.
Figure 19. Disposition Screen
The Disposition screen contains the following items that you can specify about a report:
Print on Screen? allows you to specify whether to display the report on the screen to review the information on your terminal. Click to toggle between "yes"  and "no"
  .
.
Print on Hard Copy? allows you to specify whether you want a printed version of the report. Click to toggle between "yes" and "no" .
Browsable? If checked, this field indicates you will be allowed to select a specific detail record from the report while viewing the report on the screen and go directly to a designated process by selecting OPTION 33 (OPTION OPTION 3 3). This provides you with an immediate means of viewing the record in its entirety for inquiry, modification or deletion purposes. Select END  to return to the report display.
Print Summary Only? allows you to specify that you want to print only subheading and subtotal levels, and skip printing any detail records. Click to toggle between "yes" and "no" .
Record Limit is reserved for future use and should be left blank. When implemented, Record Limit will allow you to specify how many detail records to include on the report. This feature will allow just a sample of a report to be printed if desired. If left blank, all selected records will be printed.
Format (optional) allows you to specify the desired format for the report as MPAGE, PCL, PDF, or TEXT. Most laser printers support PCL. Many support postscript. MPAGE and PCL cannot be used when printing to a local printer through a Windows client or when printing on a Windows server. They can be used if the client is a Linux desktop.
MPAGE creates an ASCII text print file which is processed by the "mpage" utility to create a postscript print file which is then sent to the printer. The printer must support postscript.
PCL creates an ASCII text print file and inserts PCL printer escape sequences at the beginning and end of the print file for attributes such as orientation, point size, lines per inch, etc. The printer that you are printing to must support PCL..
PDF creates the print file as a PDF document. Standard page headings, subheadings, and subtotals are enhanced with a larger bold font.
TEXT is the same as leaving it blank. This option creates an ASCII text print file.
Report Subheading (optional) allows you to specify a subheading that prints below the report title on every page if the design of the report supports printing a subheading.
Printer ID (optional) allows you to specify the printer on which to print this report. If you leave this field blank, the system’s default printer is used. If you enter a printer ID, it is validated against the printer file values that are established by the system administrator. Click the Scan icon to select from a list of available printers.
Form ID (optional) allows you to specify the form on which this report is to be printed. If you leave this field blank, the form is determined by the printer ID, if your system administrator specified a usual form for the printer. If the printer ID is not entered, the form that is used by the default system printer is used. If you enter a form ID, it is validated against the form file values that were established by the system administrator. Click the Scan icon to select from a list of available forms.
Print Mode allows you to specify whether you want to hold, spool, or keep the report file. Click the list button to select from the list of allowable Print Mode values:
Hold indicates you want to queue the report but not print it immediately.
Spool indicates that you want to print the report.
Keep indicates that you want to create a print file but not queue it for printing.
Print File Disposition allows you to specify the disposition of the print file after printing completes. Click the list button to select from the list of allowable Disposition values:
Scratch deletes the print file after it prints.
Save saves the print file for possible reprinting without requeuing it.
Requeue puts the print file back in the print queue with a “hold” print mode.
Priority allows you to assign a specific priority to the background task if supported by the operating system.
Print Spool Date/Time allows you to designate a future date and/or time to print the report (if supported by your operating system). If left blank, the report will be queued for printing immediately.
Number of Copies allows you to specify the number of copies to be printed.
Notify User When Done? indicates whether or not a message should be sent to your workstation when the report is printed (if supported by your operating system). Click to toggle between "yes" and "no" .
Print Banner? indicates whether the report should printer with a banner (lead page) if this feature is supported by your operating system. Click to toggle between "yes" and "no" .
The button options found at the bottom of the screen are described in the next section, Other Disposition Features.
While your report is running, you will see an “In Progress” message on your screen. If you checked Display on Screen?, after the report generates, it displays on the screen. When the report is displayed on the screen, you can use the options shown on the screen to view the entire report.